POOR MAN'S DUTCH POT SYSTEM
Call EzE if u need help - PEACE
Remember...grow
only the very best....YOUR OWN!
The Dutch pot system is one of the best designed hydroponic
systems. It is a form of drip system that is enclosed except for the top of the
growing surface. The nutrient is never exposed to sunlight, therefore no algae
will grow. The outlet system prevents roots from plugging the outlet line.
It
also has a reservoir in case of pump failure or operation with a timer.
The individual pots in this homemade system can be made at a cost of less than 50 cents per pot. This is based on finding buckets for free. Almost every restaurant or bakery or other food processing firms buy produce in these buckets and will most times give them away. If you cannot find free buckets, you would probably be just as well off to purchase "Bato buckets" for $5.00 per bucket.
GETTING STARTED
Materials
- 2 to 5 gallon bucket (use a food grade bucket)
- 2 1/2 inch PVC elbows
- 1 8 inch piece of 1/2 inch PVC pipe
- 1 4 inch (same )
Drill a 1 inch hole in the side of the bucket approximately 2 1/2 inches up
from the bottom. (place the 1/2 inch elbow with one 8 inch piece of 1/2 inch PVC
pipe in the bottom of the bucket, raise it 1/2 inch. When level, the end of the
pipe should mark the correct place to drill. It does not have to be perfect to
work correctly.)
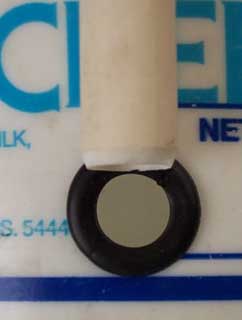
- If done correctly, the 1/2 inch elbow should be sitting on the extension 1/2 inch from the bottom of the bucket. A
3/4th inch grommet is placed in the 1 inch hole
The
grommets can be purchased from the electrical department at Home Depot.
Just put an elbow on each end and it is ready to go.
It is a 5 gallon cheese
container that was acquired free from a restaurant.
The
drain system is a length of 1 1/2 inch PVC pipe with a cap on one end and a "T"
on the other. A 7/8th inch hole is drilled in the top of the pipe for each
bucket at a distance for proper plant separation. The drain from each bucket
should be between 1/4 and 1/2 inches into the pipe. The end cap on the "T" end
is to refill the nutrient and check the level with a dip stick. The bottom of
the "T" drains through the lid into the nutrient tank.
There
are three holes drilled into the lid. One for the 1 1/4 or 1 1/2 inch drain, a
smaller one for the pump outlet, and a small one for the pump extension cord.
The
nutrient feed system is 1/2 inch PVC with a 1/4 inch black irrigation tubing for
each bucket. A hole is drilled into the PVC that is slightly smaller than the
black tubing. An angle on the end of the tube makes it easier to insert.
The 1/4 holes are drilled above a pot so if one leaks, it drips into the pot.
The pump is connected to the distribution system by drilling a hole in an end cap slightly smaller than 1/2 inch then slide a piece of 1/2 inch vinyl tune 4 inches long into the hole. Half will go into the hose, half into the PVC pipe. Use PVC cement between vinyl tube and end cap if necessary. The other end had a cap.
By using a single supply line with all connections above a pot, any problem with leaks is eliminated. If any connection leaks, it will drip into one of the pots.
Medium added: 4 inches of coarse pine bark topped with 6 inches of cypress chips. There are a lot of other things that could be used. These were the things on hand. A 1/4 inch hole was drilled 3 inches down the side of the 5 gallon pots to help hold the feed tube.
An old milk jug plus a 4 inch piece of 1 inch PVC makes a good funnel for
refilling nutrient. Cut the bottom out of the milk jug, dip the spout in warm
water and slip the PVC in about 1/2 inch. Use PVC cement if necessary. The 1 1/4
inch cap can set loosely on the "T" for easy removal to use the funnel.
These Documents contain information gathered from many Online
Communities and all possible references have been given to the authors
of each individual article.


Comments
Post a Comment